
Using state machines to define and visualize routing logic
Routing logic in complex web applications, like multipage form wizards, can be a source of confusion and bugs. It pays off if the technical solution your team chooses makes it easy to change where pages route to, and provides a holistic view of how pages connect to each other. State machines can be a language agnostic option for maintaining the routing logic in your applications, and they can be visualized!
Here's how I've used a state machine to define and visualize routing logic in a large branching government application form.
What’s a state machine?
State machines can sound intimidating when you first read about them, especially when most blog posts regurgitate the Wikipedia definition, which says state machines are “a mathematical model of computation.”
The main points that have helped state machines click for me, and the most relevant for this post are:
- A state machine can be in exactly one of a finite number of states at any given time. For this post, you can replace “state” with “page” — your app can show one out of a known set of pages at any given time.
- A state machine can change from one state to another in response to an event; the change from one state to another is a transition. For example, a user pressing a button (the event), transitions your app from one page to another.
State machines have been around since the 1950’s, so we’re not inventing anything new here, and they have a wide range of use cases.
Elements of a routing machine
On the projects I worked on while at Nava, each project involved building multi-page, branching form experiences. Our forms often include branches a person is routed down, depending on their answers to preceding questions. Our forms need to answer: What’s the next page a person should be routed to after answering the current questions and pressing “Continue”?
Using a state machine for this has worked really well. Below are the main elements of what we’ve implemented:
- Visualization
- Routes
- State machine
- Router
Visualization
One of the biggest selling points to me for using a state machine for routing logic is that you can render your state machine as a diagram, visualizing what’s defined in your code. This is a helpful tool for auditing your routing behavior, identifying the various paths a user might take through a flow.
There are various ways you can generate this diagram. If you’re using XState, you can use the XState visualizer or inspector. On my most recent project, we used Mermaid to generate our routing digram, and we render it in our project’s Storybook. GDS’s Smart Answers tool include a public route for visualizing each flow.
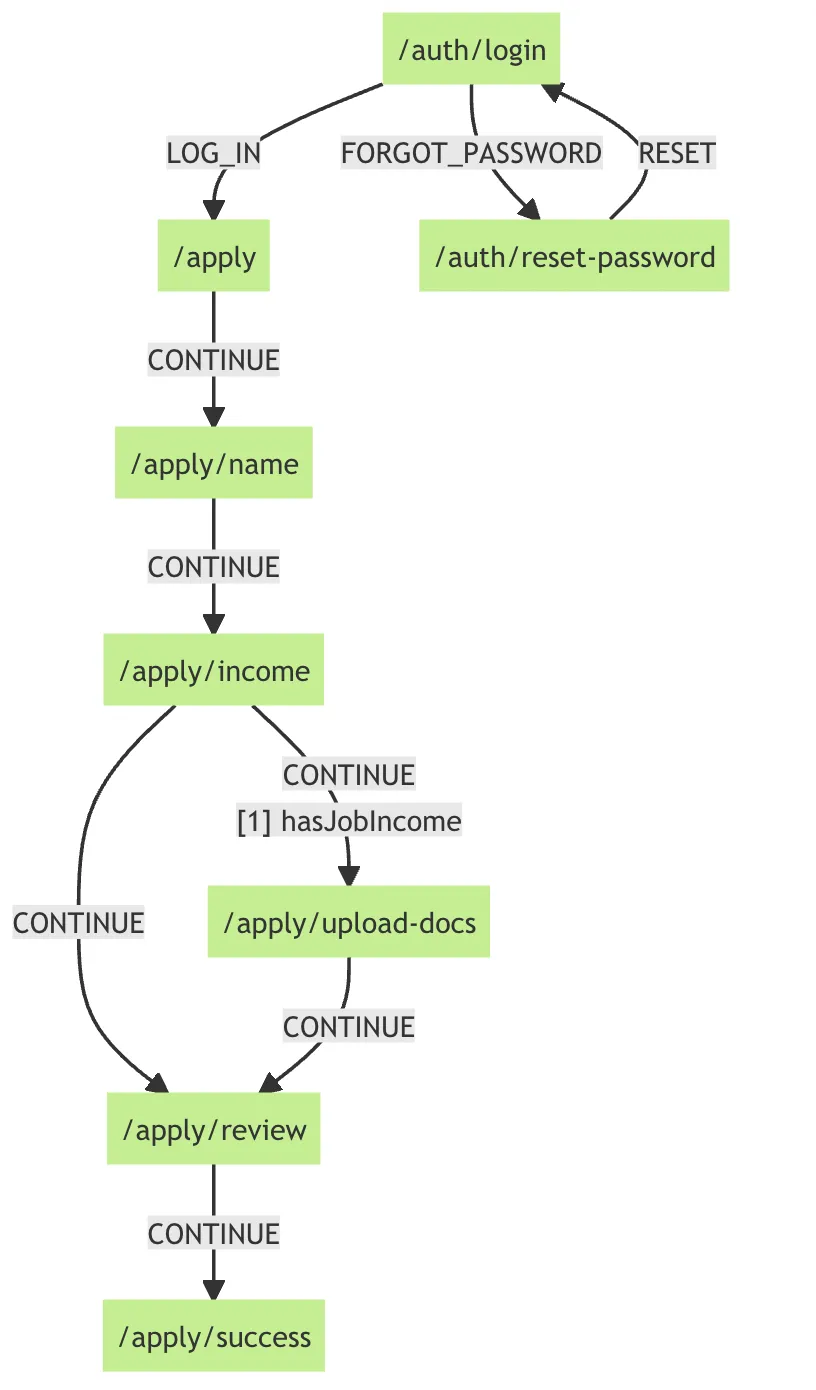
Here’s what our example state machine looks like using Mermaid to generate a visualization:
Here’s the state machine in XState’s visualizer for comparison.
Routes
The format of this can vary, but it’s helpful to have a mapping of keys to routes so you have one place for editing the pathnames for your routes. A JSON object is one way. For example:
State machine
Your state machine is where you define which events result in a routing transition. Within this you have:
- State nodes. Each route is a node.
- Events. Each route’s state node has events that result in a routing change.
- Conditions (or “guards”). Some events conditionally transition to a different route, depending on the current page’s context.
Below is an example state machine, using the XState library, which adheres to the SCXML specification. XState makes it easy to get started with state machines in JS, but it’s not required to use XState, or even a third party library, to use state machines in your app.
Router
Your router includes methods for triggering events, reading the next page’s path, and navigating to the page. The core methods of this router are:
- A method for retrieving the next page from the state machine
- A method for changing the current page
Our method for retrieving the next page should support passing in “context,” which any guards in our state machine can read to inform conditional routing logic.
In our example state machine above, we have an “income” page which upon a CONTINUE event will transition to one of two possible routes. The income page’s form state is the context we pass into our router to determine which page is next. In React, that might look like this:
Interested in learning more? Check out statecharts.dev.